Introduction to Nodejs and Express
We are going to learn some back end web development using JavaScript. The framework we are going to learn is very useful for back end web development. That framework is Nodejs. We are also going to use the most popular middleware for Nodejs. That middleware is “Express”. In this tutorial we expect you have some JavaScript knowledge. Also some HTML and CSS for templates and styling purposes. At the end of this tutorial you will have a great foundation to start creating your own applications.
Introduction
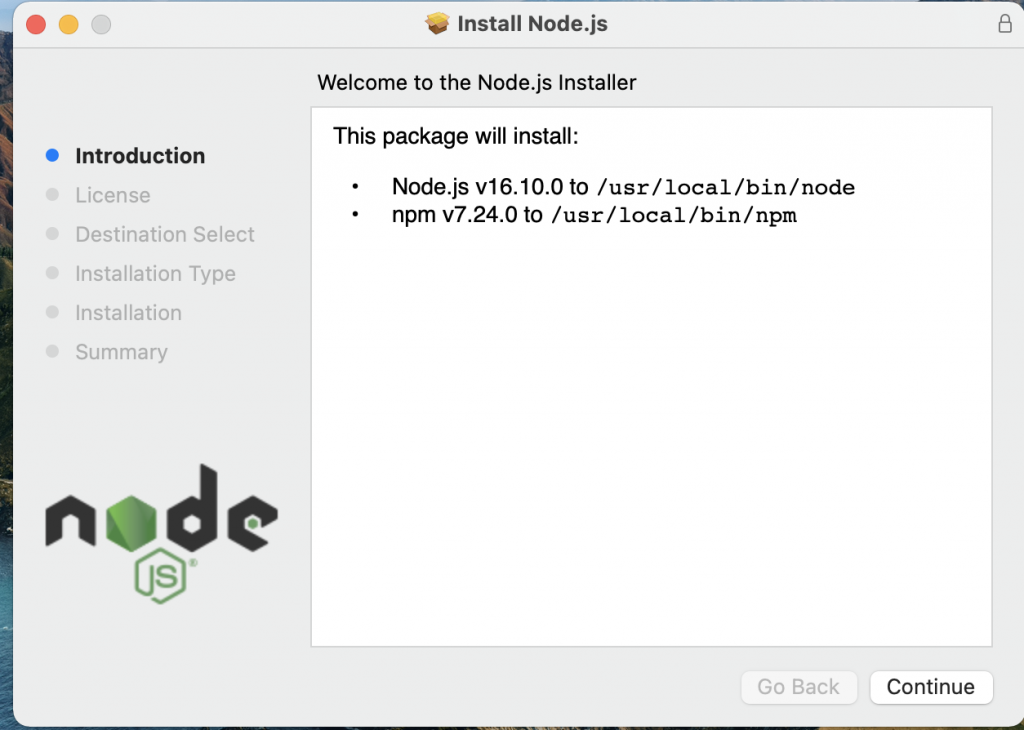
To start we first need to download Nodejs from its website. Then we proceed to install NodeJs. Once the software is installed, “The Node Package Manager” npm will also be installed.
Once we finish the installation we can check the version of the installed softwares in the terminal. We only need to type the command npm -v && node -v to get the result. If your result is similar to the one we show you below; that means you successfuly installed Nodejs and npm . Otherwise you need to check for installation errors.
node -v && npm -v
v16.9.1
7.21.1
Creating a Simple server
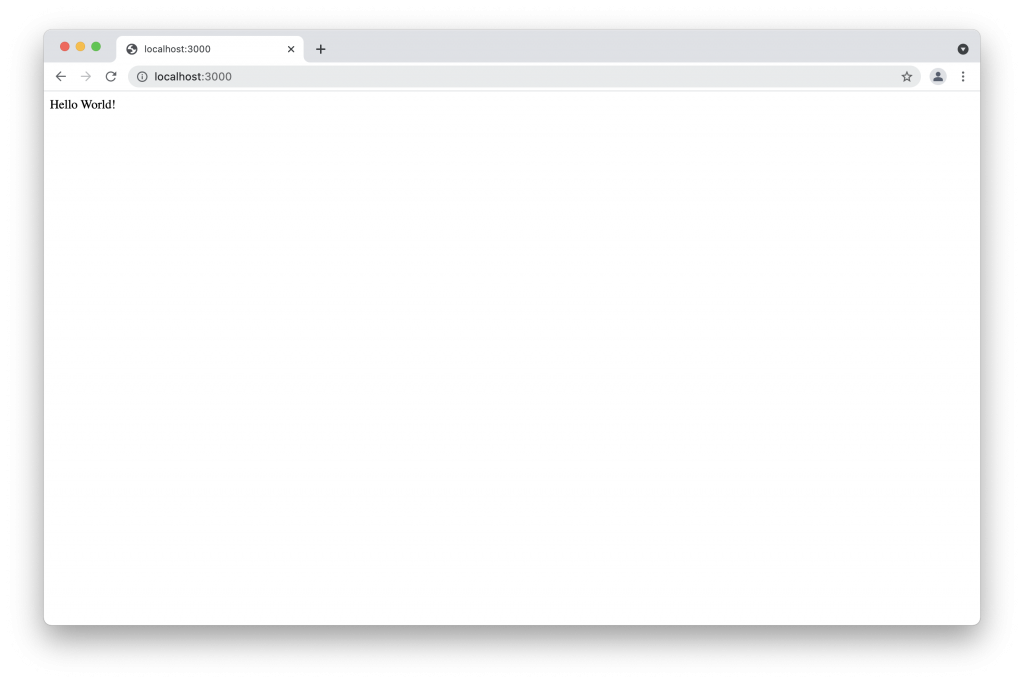
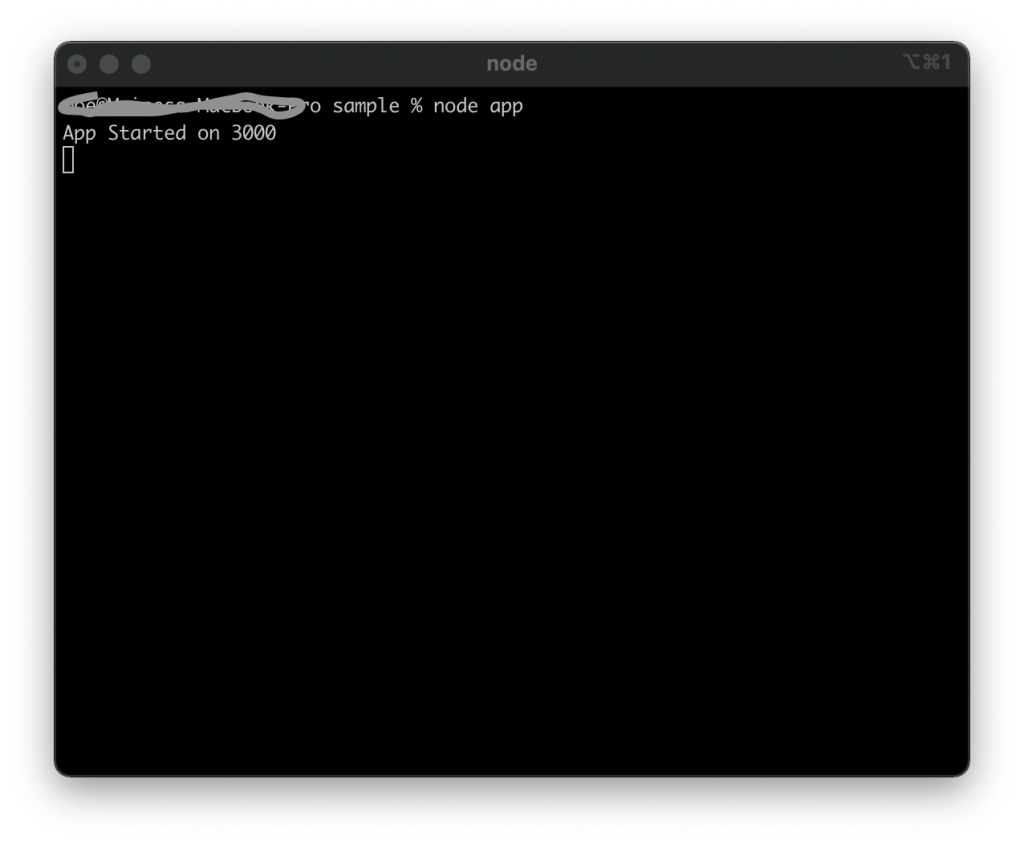
It’s quite easy to create a simple server with Nodejs. As you may already know, you just need the terminal and a text editor. My favorite text editor is Visual Studio Code; but you can use your preferred one. The result is going to be the same. Once we choose our text editor we can create a file and name it app.js. After we create the file we can type the example we see below in our file. Then you will get a result of a route and a console log.
const http = require('http');

const hostname = '127.0.0.1';
const port = 3000;

const server = http.createServer((req, res) => {
  res.statusCode = 200;
  res.setHeader('Content-Type', 'text/plain');
  res.send('Hello World!');
});

server.listen(port, hostname, () => {
  console.log(`Server running at http://${hostname}:${port}/`);
});
The example above shows how to create a simple server using Nodejs. This example does not use npm. All the used packages are default node packages. As you can see we firstly required the http package to create the route. Then we created a host name and a port. After that we send the status codes and headers. Nodejs Applications listen the port and we get a “Hello World” result in our browser. If you want to see the result, you only need to type in your terminal node app . Then you can go to your favorite browser and type localhost:3000. The result will be similar to the one we show below.
Introduction to Express
The example above is the most basic example of a Nodejs server. We can create a lot of things by only using Nodejs; but sometimes it can be tricky. You can see the Nodejs Docs and explore all you can do by only using Nodejs without any additional package. Using only Nodejs can be confusing sometimes. For that reason we have the npm. One of the most popular packages is express, and we are going to learn a lot of express in this tutorial. Let us start learning the express package.
Installing Express
When we started this tutorial we set some instructions to install Nodejs and npm. After we installed these softwares we could check their version. In order to install any package we only need to type the command npm install followed by the package name. We can install express as any other package as you can see in the example below.
npm install express
Creating an Express Application
To create any Nodejs application using the npm, We first need to create our package.json file. In that package we specify our dependencies and scripts. We can. also specify our dependencies for development as we are going to see below. In order to create the package.json for our application, we need to create a folder with the name of the application we want. We can create the folder in our terminal or manually. After we the folder is created we go to the folder in our terminal and type the command npm init. We can also type the command npm init -y.The example below shows you how the package.json is created.
npm init

This utility will walk you through creating a package.json file.
It only covers the most common items, and tries to guess sensible defaults.

See `npm help init` for definitive documentation on these fields
and exactly what they do.

Use `npm install <pkg>` afterwards to install a package and
save it as a dependency in the package.json file.

Press ^C at any time to quit.
package name: (sample)
version: (1.0.0)
description:
entry point: (index.js) app.js
test command:
git repository:
keywords:
author:
license: (ISC)
About to write to /Users/moe/webapps/node/sample/package.json:

{
  "name": "sample",
  "version": "1.0.0",
  "description": "",
  "main": "app.js",
  "scripts": {
    "test": "echo \"Error: no test specified\" && exit 1"
  },
  "author": "",
  "license": "ISC"
}


Is this OK? (yes) y
In the example above you can see how we create the package.json using npm init. We created it and specify everything in the terminal. In case we want to create everything automatically, and then modify it in our text editor. We only need to type the other command that is npm init -y.
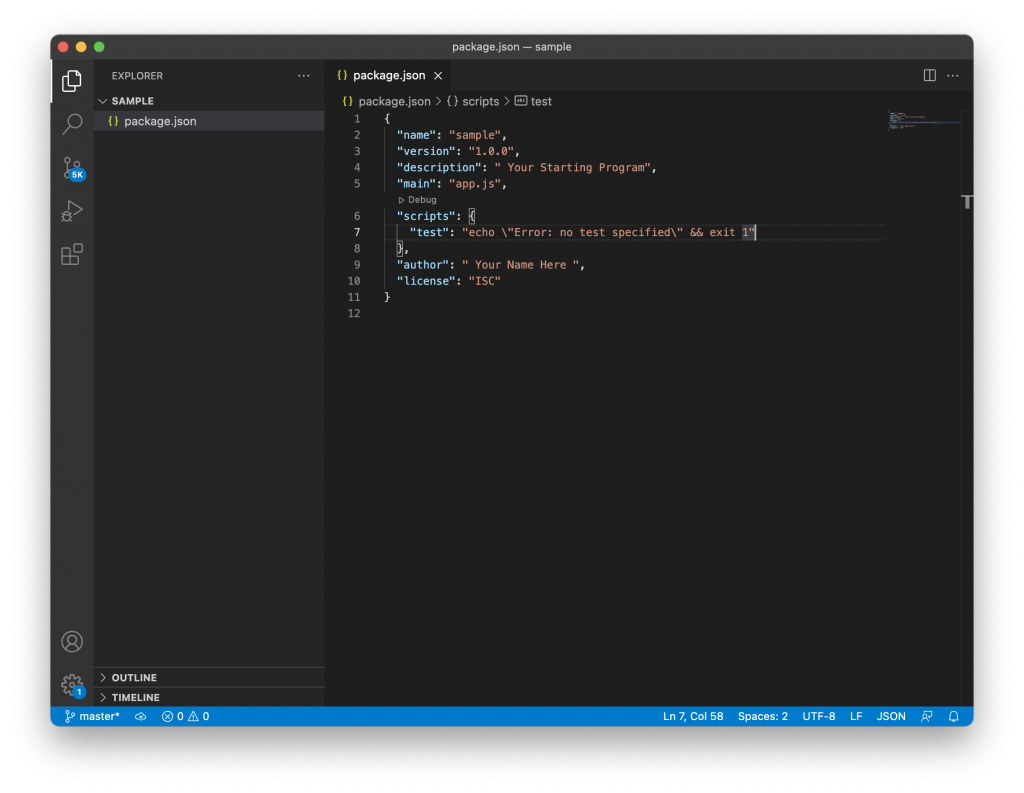
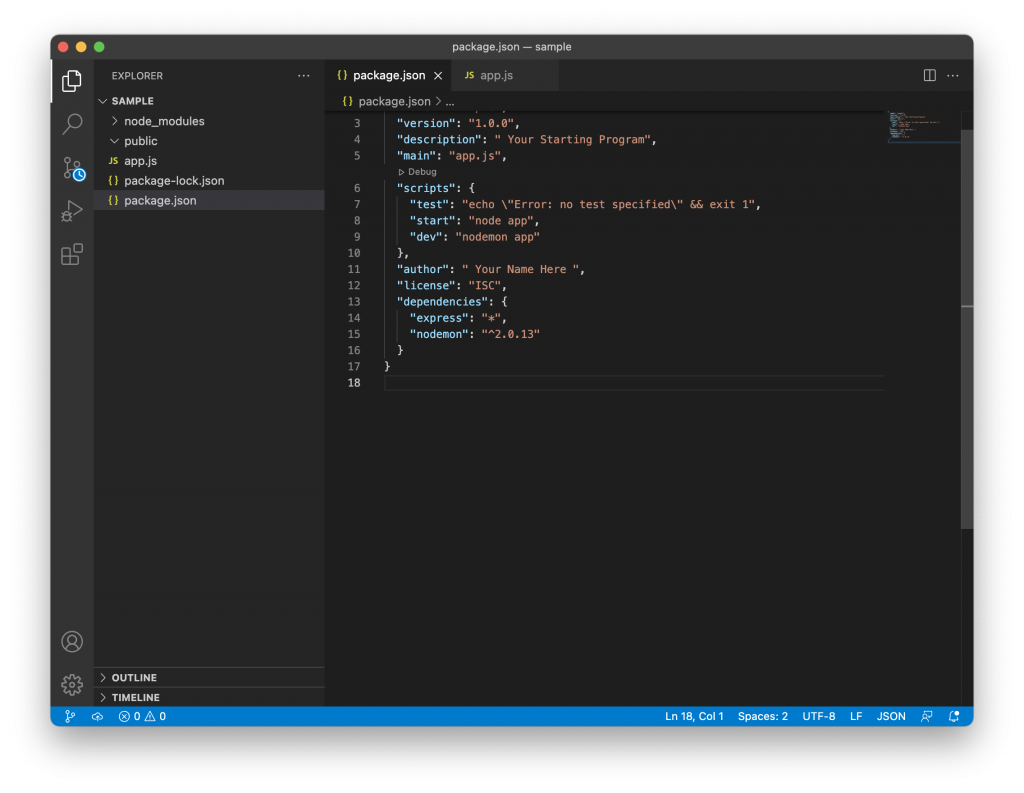
Modifying our Package
Once we create our package we can modify it using our text editor. No matter if you created it using npm init or npm init -y, the result is similar. You name your application using the name you want. Most times you use the same name we used for our container folder. By default the version is 1.0.0; you are creating a new application. In the description you can add a brief description. The main part is the name of the main file of your application. By default it will be index.js; but I personally name it app.js. You can name it as you want. in the scripts you can type the scripts you are going to use. We are going to explain scripts below. In the author field you can put your name or the name or your company. The image below shows you the package.json using Visual Studio Code.
Setting Up The Express Application
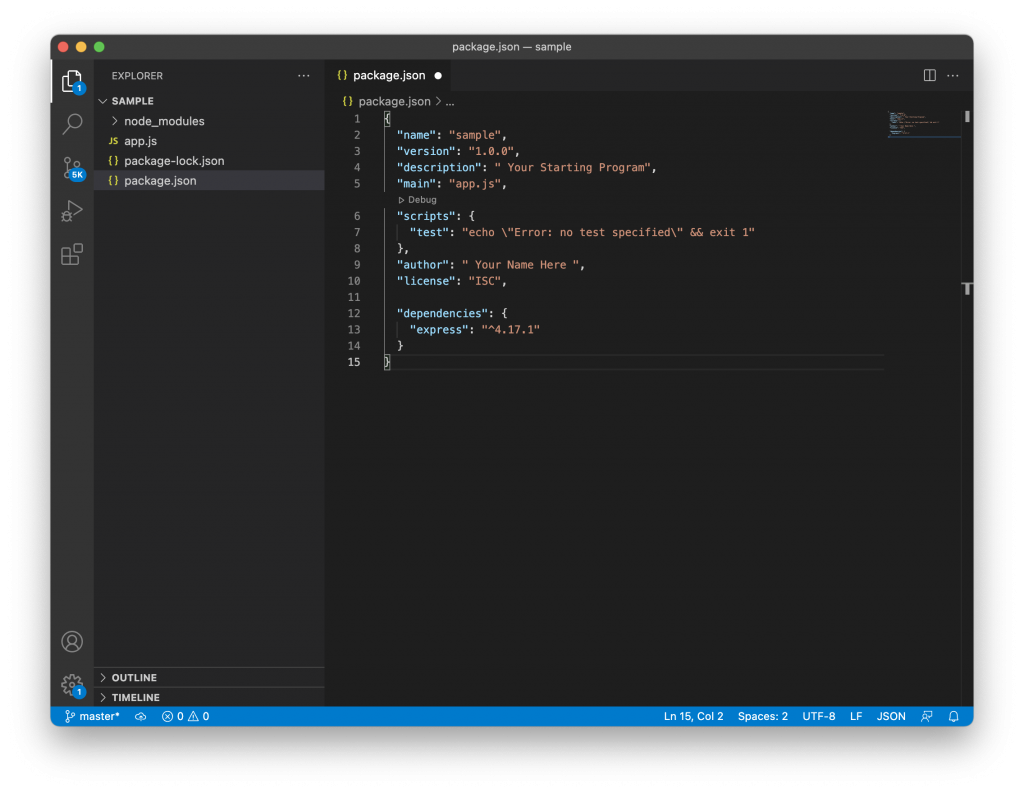
As the package.json specified the name of our application, now we proceed to create it. We said above that default name for any Nodejs application in the package.json is index.js. We can name as we want, and I personally like to name it app.js. In the same folder we create an empty file and name app.js Now we have two files for our application. We also need to install express. We previously showed you how to install express. You only need to go to your terminal and type the command npm install express. That command is going to install the latest version of express in your application. Once express is installed we can check our package.json file and see that another field is added. that field is the dependencies field. and inside is the version of express installed. as we show in the picture below.
npm install express
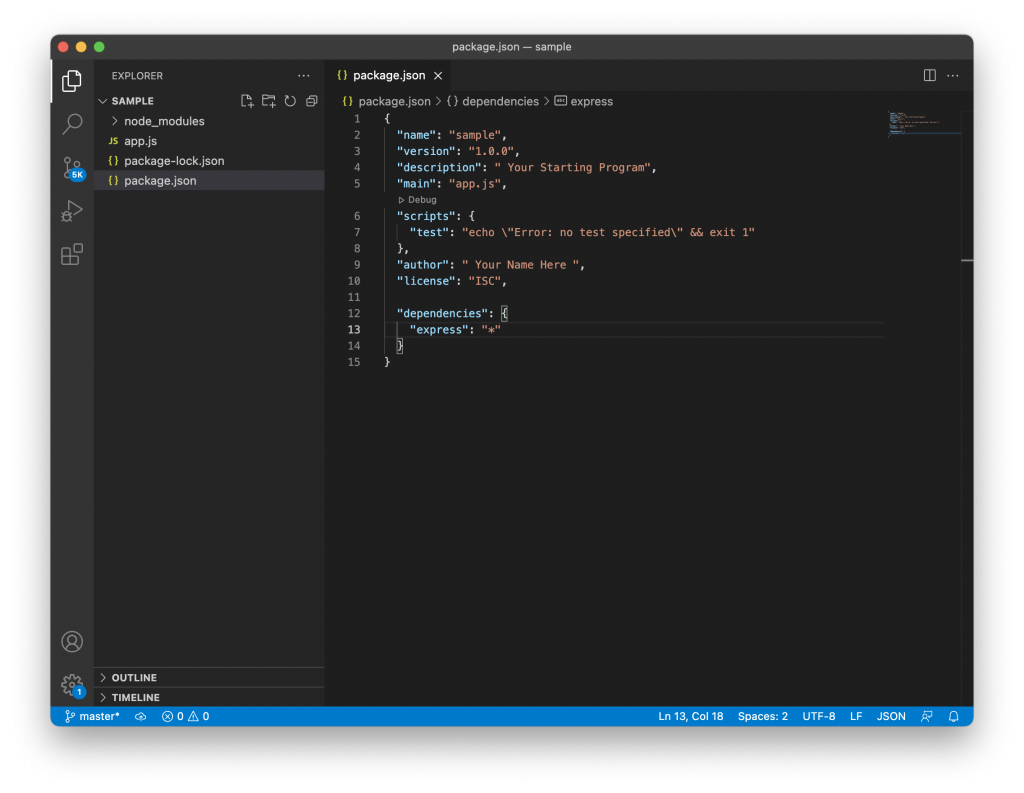
Once we install the first package in this case express, another file will be generated. This file is the package.lock.json. That package describes the exact tree that was generated. That packages also modifies itself when we install more dependencies. We also can create the dependencies field manually in our text editor. We can specify the dependencies we need. Then we type in our terminal npm install. All dependencies will be installed. In case we don’t. know the number version of the dependency and we want the latest one. We can type an asterisk * where the number of the version goes. The latest version of the dependency will be installed. Another image below shows you how to do it.
Creating The Express Application
After we set everything up in our package.json file and also create the app.js file we can start creating our application. In the app.js file we start importing our packages. As we only have the express package installed. We proceed to import it or required in our app.js creating a variable that import it. To import or require a package we can use the following syntax.
import express from 'express';  //ES6  syntax.

let express =  require('express');
 // Creating the Variable. That is the most used syntax and the one used in this tutorial.
After we create the express variable we can create the app. In order to create the app we only use the express variable that we created above as a function. Then we create a variable called app as the one we show below.
let app = express();
Adding a Port for our new Application
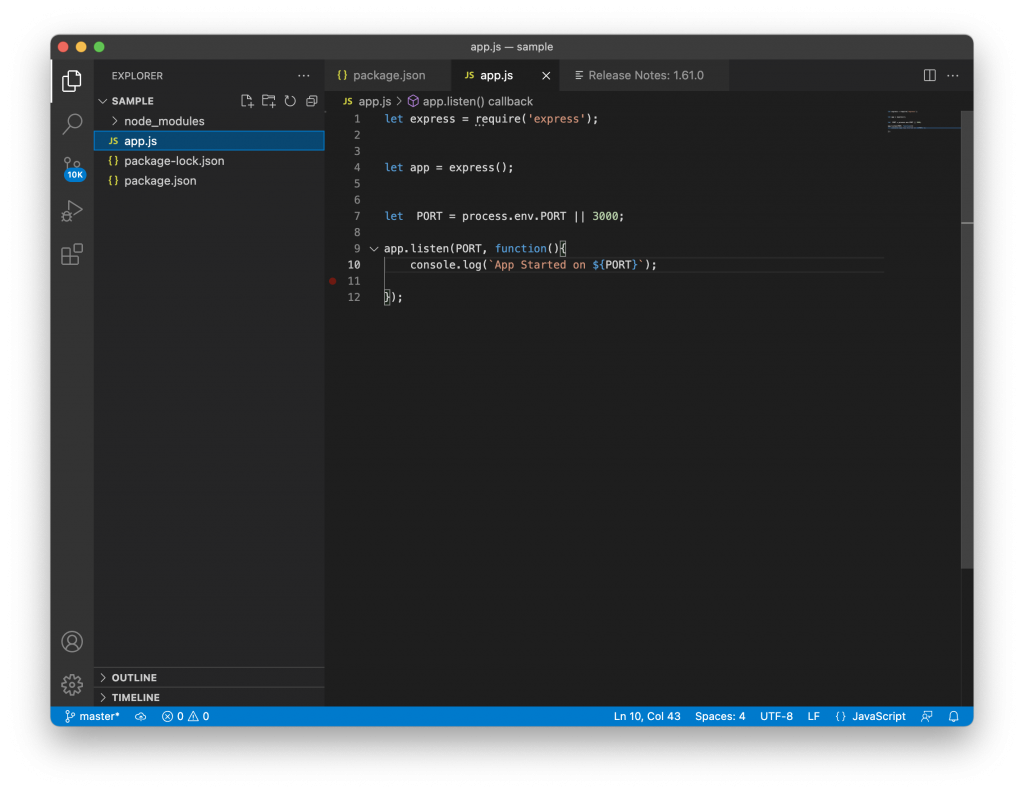
Once we create a new app the app needs to listen to a port. So we can create a variable called port and assign a port number. For development purposes we assign a number; but in order to deploy our application we use the process environment port. After the post creation we can use the listen function and add another callback function to get some results.The example below shows you how to use the process environment port and the number at the same time using a logic OR (||).
let PORT = process.env.PORT || 3000;

app.listen(PORT, function(){
    console.log(`App Started on ${PORT}`);
// Using Back ticks  we can add the variable name to a string using "${}"
});
If we followed the same steps we explained here, we created our application. That is a simple application but that is the starting point. In order to run our applications we need to go to our terminal and type node app. Our application will run, and the result will be similar to the one showed in the images below.
Express Routing
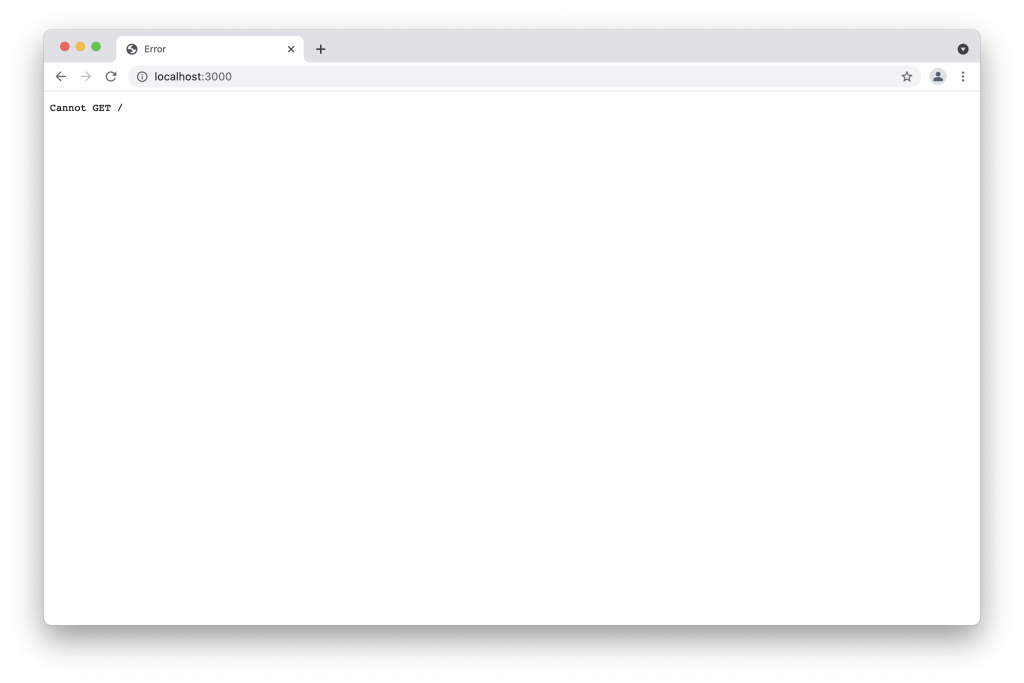
Now that you successfully created your application you can open your browser and go to localhost:3000 and see some results. Well, you can see the application is running; but in the browser you don’t have anything. The only result you see in your browser is that the browser cannot get the route. The result is similar to the image below. For that reason we are now going to learn some routing for express applications.
Now it’s time to get some routes to our application. In order to add routes we need to apply the HTTP verbs. These verbs are get, post put and delete. In this introduction we are going to use only the get. in a further tutorial we are going to learn how to use all the others. The get method gets the route of the page. the slash symbol( / ) is the home page. We are also going to create some other routes; but let us start with the home route. Most times we start creating routes after the app declaration and before the PORT. If you add the following code to your app you are going to send a Hello World! to the browser.
app.get('/', function(req, res){

       res.send("Hello World!");

});
You can see in the code we added above that we are using the get method as a function. Then we add the home route ('/'). After that we created a callback function with the parameters req and res. These parameters are also Nodejs built in functions. The req parameter requires information, and the res parameter can send information to your browser. You are going to learn deeper about these parameters in a further tutorial. If you added the code to your application your result will be similar to the one we show you below.

The Express static Public folder
Now you could send some information to your browser; but that is not the result you want in your application. We can create a static folder where we can put our HTML files. In that folder we can also put our CSS and Javascript files. We can name the folder as we want. Most times we name the folder the public folder. To add the public folder to your app you need to add the following code.
app.use(express.static('public')); // Using Express static. The name of the folder is public.
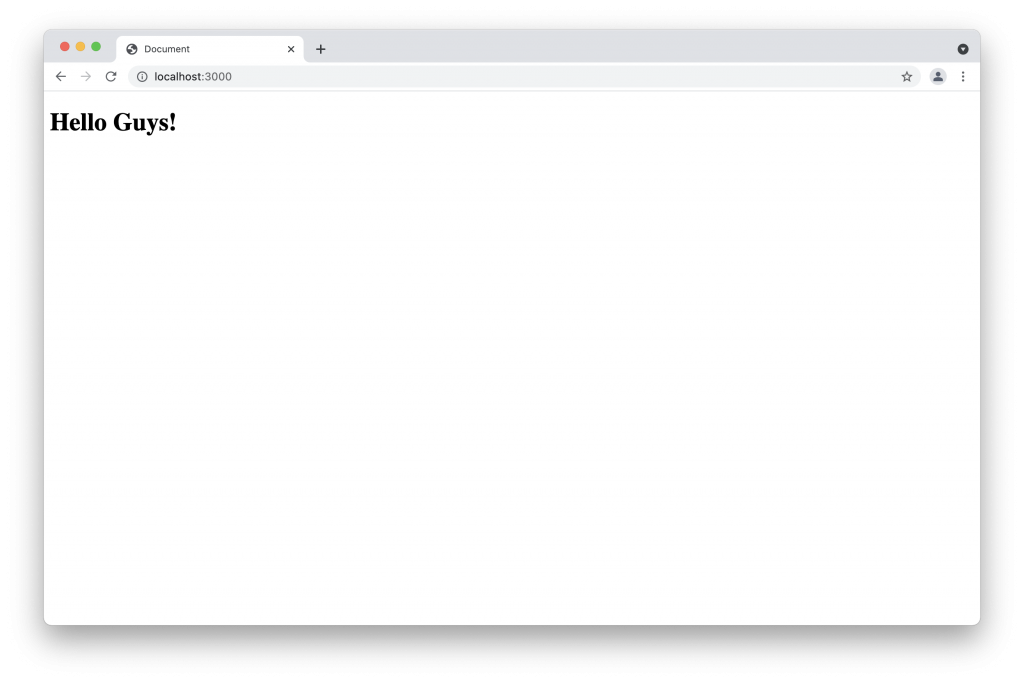
After we create the static folder we can create a file called index.html. By now we are only going to display a “Hello Guys” <h1> heading as the result. You can create the html file you want in your html. You only need to name it index.htm so express recognizes the file. now if you reset your application using CTRL+C, and restart it again. Then you go to your browser localhost:3000, and see the new result. ( Make sure you comment out the first route.)
Installing New Dependencies
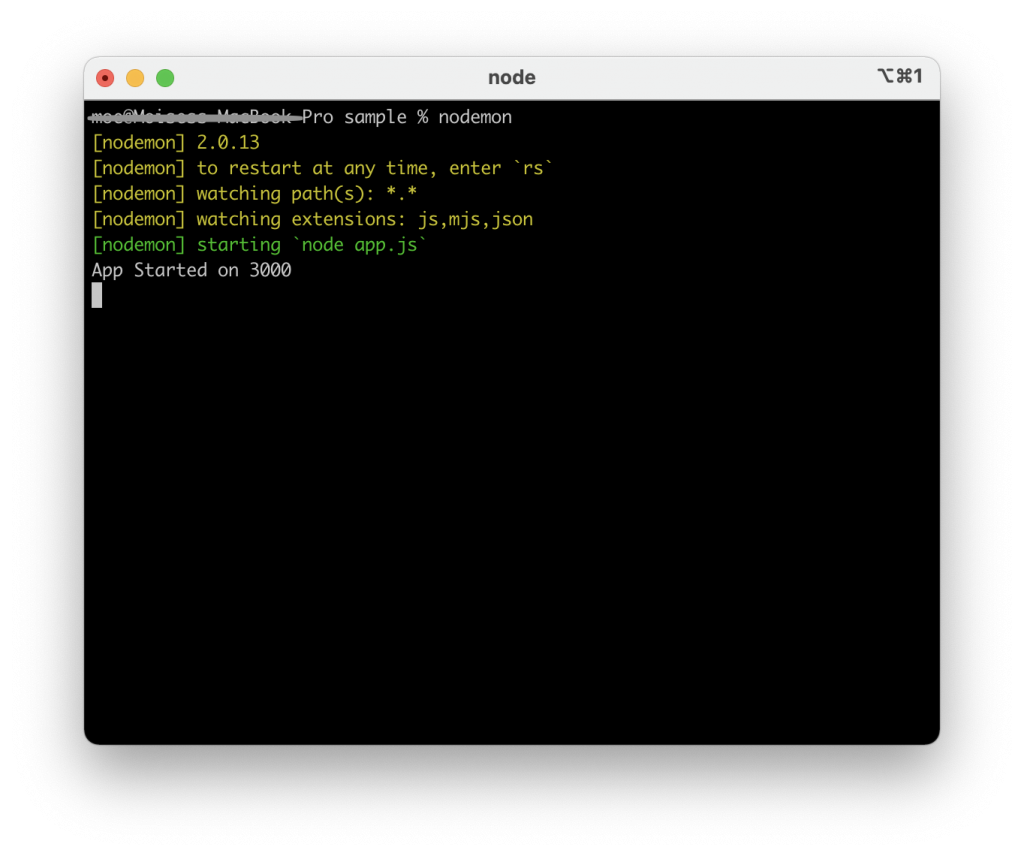
In express applications we can install as many dependencies as we want. We only need to type in our terminal npm install followed by package name. Once we install the package, it will be added to de dependencies in your package.json file. Now let’s install one package. In previous examples you saw that you had to reset terminal when you modified your code. This package is going to avoid the need of resetting your application as you add code. This package is Nodemon. You only need to type the following command, and your application will be ready.
npm install nodemon
After you installed nodemon, you only need to type nodemon in your terminal in order to use it. Nodemon will reset the application after you add some changes and saved them. In case it does not run on the first try, you need to install the package globally using the following command.
npm install -g  nodemon

OR

sudo npm install -g nodemon
Working with Scripts
When you first saw your package.json you noted there is a field called scripts. In Nodejs these scripts refer to commands we type in our terminal. They are not like the regular JavaScript scripts. To run any script you created you only need to type the command npm run followed by your script name. When you first create the package.json you can see there is a test script automatically created. Now let us create some scripts for our package.json The first script we are going to create is the start script. Most deployment process environment use the start script by default to start any Nodejs Application. Then we are going to create a dev script in order to use nodemon. The image below shows the modified package.json
npm start    //starts the application

npm run dev // starts the application via nodemon
Express Template Engines
Besides using plain HTML in the public folder, we can use some view or template engines. That practice is very useful while creating express applications. Express has many view engines such as ejs, jade, handlebars, pug etc. You can see more information about view engines in their website. My Favorite one is ejs, because that one is similar to HTML. In order to add a view engine to our application, we first proceed to install the package. In this case we install ejs and then set the view engine in our app.js using the app.set() function. After that we can also set a views folder as you can see in the example below.
npm install ejs
app.set('view engine', 'ejs'); //setting ejs as our view engine

app.set('views', 'views'); // setting the views folder
After you set the view engine and views folder to your application, you proceed to create the views folder. If you are using a view engine is because you are not going to use the index file that you created in the public folder. You can delete the file and keep the folder for styling and scripts. Now in your views folder you can create a new index file. In that file you use the file extension ejs. The syntax will be similar to HTML. In a further tutorial we are going to show you how to deal with forms and databases using Nodejs and template engines.
Routes to Views
The previous section shows how to set a view engine and create the views. In order to see the views in your browser, you need to add routes to your views. That is an easy task in express. When you used the app.get('/') function you also used the res.send() method. In order to display a view from your views folder, you need to change the method to the res.render method. That is going to render the view in your route. The example below shows you how to render a view called index to our home route.
   app.get('/', function(req, res){
        res.render('index');

  });
Using the Express Router
Imagine you have several routes in your app. In express we have pre build router that we can use for these cases. Even if you don’t have too many routes, using the router is a good practice. Most times we create another folder called routes for our routes files. After we create the folder we can add as many files as we need. In this case we are creating a file called index.js. In this file we are going to use the pre built express router. Then we can export the file to our app.js file. The example below shows you how to use the express router.
let express = require('express');
let router = express.Router();

router.get('/', function(req, res){

res.render('index');

});

module.exports  = router;
Now we can import the route in our app.js file. We need to make sure we delete the route we had before to avoid errors in our applications. Below you can see how to add the route to the app.js
let index = require('./routes/index');  // importing the route from the routes folder

app.use('/', index);  Implementing our route with the use() function.
As we said before you can use as many routes as you want. We can create another file in our routes folder similar to the one that we created before. We are going to call this file users.js. Then we can import it to our app.js as we can see the other example below.
let users = require('./routes/users'); // Importing the users route

app.use('/users', users); // Adding the route to our application.
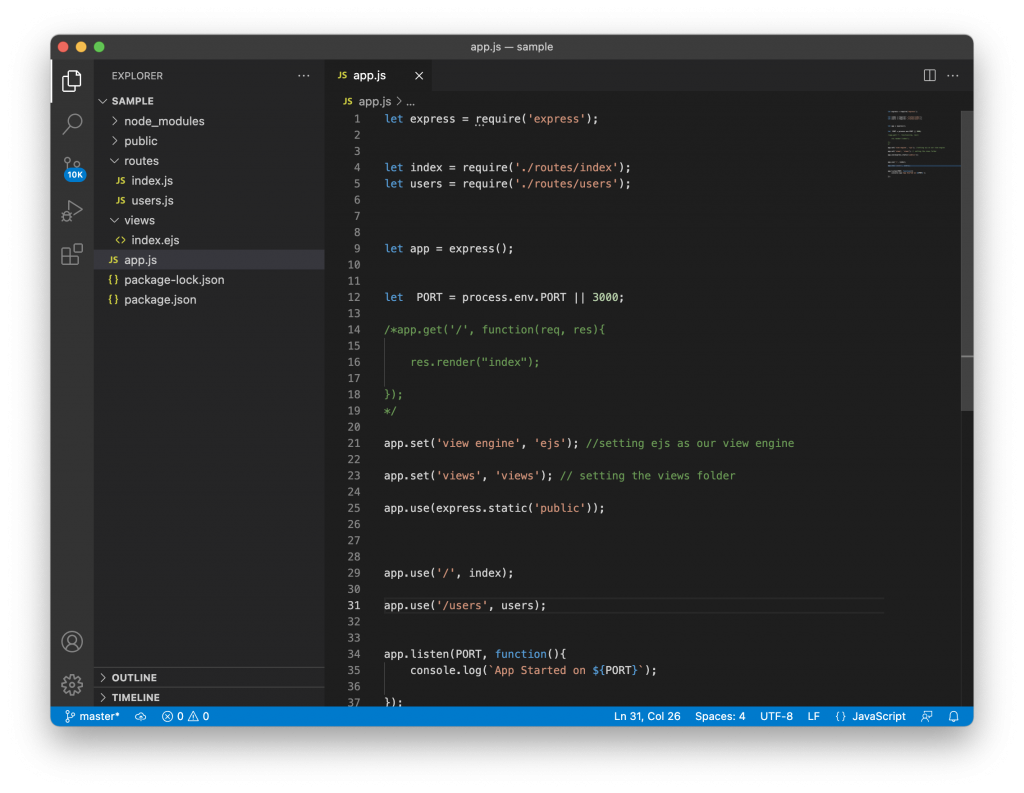
If we add all the changes to the app.js file; the file will be similar to the one we show you in the following image.
Express Generator
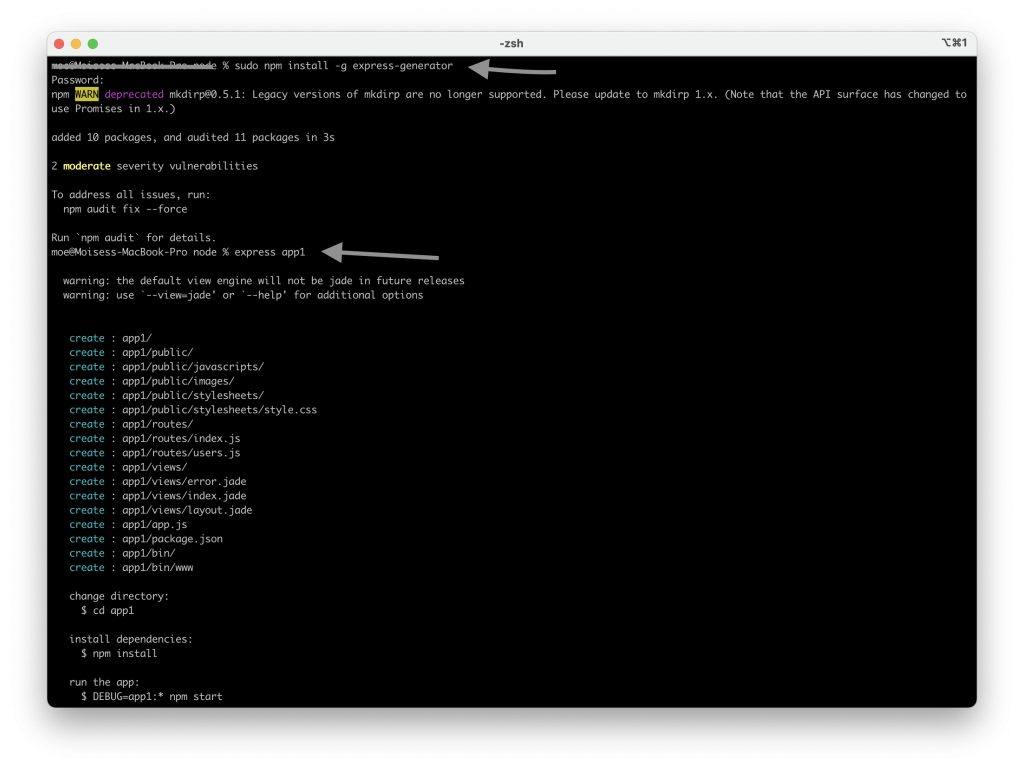
There is a node package called express-generator. That package serves as a shortcut to create an express application. That package will create the package.json, the app.js , and many other required files. It will also add a view engine though we need to install all the dependencies using the npm install command. To use the express generator we first proceed to install it using npm install express-generator. Now we can create an application using express as a command as express app1. Then we install dependencies as we stated before. The application generated with express generator listen port 3000 by default. the image below shows you how to use the express generator.
Conclusion
This tutorial is an introduction to Nodejs and Express. We focused more on express because learning a package is a great way to start learning Nodejs and more of its packages. Express is a complete package that we can use to create any application. This is only an introduction to Nodejs and Express. At this time we are working on some others more advance tutorials. Thank you for reading our tutorials, and we hope you learn a lot in this tutorial.
You can find more information about Nodejs in their Documentation. Also you can find information about express in the Express Website. The Express MDN also has a lot of useful information and examples.