Easy Learn HTML

Introduction
Hypertext markup language or HTML is the base for all websites. Nowadays there are many website builders or templates which help people to create websites easily. They are only applied HTML though sometimes they can be really helpful and time saving. It’s very good to learn HTML. If we know HTML we do not need a website builder and we also can create websites the way we want. As I stated before HTML is only the base for websites. It’s also very easy to learn. To create or design websites we also need to learn CSS (Cascading Style Sheets). JavaScript is also a very important programming language used by most websites. Learning some programming we can create a website that ca perform some actions. Although CSS and JavaScript are also fundamental for website creation and design; in this post we are only covering HTML.
HTML is NOT a programming language. it’s a markup language. To start creating websites in HTML the only thing we need in our computer is a “Text Editor” and a browser to see the results. There are my text editors everybody can use for free. The default text editor for Windows is “Notepad”, for MAC is TextEdit. There are also many text editors that we can download. They are very helpful with syntax, organization, and many other coding tools. My favorite and the one I most use is Visual Studio Code. You can download it for free on their website.
To start learning HTML we only need to create a file in our preferred text editor, and name it yourFileName.html; (the filename you want .html) for the home page the default is index.html; that’s how your host is going to interpret.
HTML Skeleton
Once you created your file with the html extension you should type the text you see below. That is the skeleton for all websites. As you can see there are many tags. HTML is based on tags. <html> </html>. You can see there are opening tags and closing tags for each one. Closing tags are not necessary for some elements that we are going to see later; but let’s start to describe all tags you see now.
<!DOCTYPE html>
<html lang="en">
<head>
    <title>Document</title>
</head>
<body>

</body>
</html>
<!DOCTYPE html>
This tag only specifies the document type. Before we did not need to put it. Nowadays most websites are created using HTML5. This tag make sure the document is in HTML5.
<html>
You can see there is an opening tag starting the website, and a closing tag finishing the website. The <html> tag is the root of the web site. Everything should be inside the <html> </html>. Also inside the opening tag you can see the the part lang= “en.” Where lang is called the attribute, and “en” is the value of the attribute. It denotes the language of the website is English. There are many HTML elements with attributes we are going to see them along the way. As we can now see, we type the attribute inside the opening tag, then we use the equal sign (=) and then we type the value of the attribute in quotation marks.
<head>
The head is where the logic part of the website goes. You add your style in the head. Also you add can scripts in the head (Although scripts should be placed at the end of the document.) though the only tag you can see now is the <title> tag. Which is the title of the document. You can see the title of the document on the top of your browser when you open your website.
<body>
The body is where you code your information. You can add the remaining of the tags inside the body. There are tags to format text, images, links, etc. we are going to see how everything works.
6 HTML Headings
There are 6. HTML headings. we use them to add headings to the documents. We can c create them with <h> tags. starting from <h1> to <h6> as we can see in the following example.
Paragraph tag <P>
Using the <p> tag is the way you can create a paragraph or perhaps a single sentence. You can see two examples below. One of them contains a single sentence, and the other is a multiline paragraph. You can write as many words as you need. It is going to be a paragraph or a sentence; the only thing needed is the <p> opening and closing tag.
Intro to Inline Elements
As you may see in the two previous examples. The heading tags <h1> to <h6> and the <p> tags once we close the tag we get a new line. These types of tags or elements are called block elements. There are some other types of tags which are used to write in the same line called inline tags or elements. You can use those tags inside the block element and they are going to be displayed in the same line. Even when placed below the block tags they are going to be displayed in the same line. Many examples of these tags are:
<i>
The <i> tag display Italic text
<b>
The <b> tag display bold text
<del>
<del> tag displays a line through the text. Shows contents that is discarded or deleted.
<strong>
<strong> tag display strong text. It can be used to replace the <b> tag. Both of them display text in Bold.
<q>
If you need to wrap text in quotation marks, it’s time to use the <q> tag. The text inside the <q> tag is going to be displayed in quotations.
<ins> Insert Text
The <ins> tag is used to display inserted text. Most of the browsers are going to show the inserted text with an underline.
<sup> Superscripted Text
<sup> tag is used for superscripted text. The best example is for first, second, etc. 1st 2nd
<sub> Subscripted Text
Subscript text is displayed using the <sub> tag. Best examples for subscript text are chemical formulas and number bases.
Below you can see a little demonstration of these inline elements. There are many others going to be used along the tutorial. We can see a little demonstration below of how they are displayed.
<br> or <br /> Line Break
Break line. The break line tag <br> or <br /> breaks the line and starts a new line after. If you want to continue writing in the next line you only need to insert the <br> text after the <br> tag is going to be displayed in the next line. As you may notice, the <br> tag does not need a closing tag.
<hr> or <hr /> Line break marking line
The <hr> tag also breaks the line; it also displays a single line.
The Anchor Tag <a>
The anchor tag <a> is considered one of the most important tags in HTML. Maybe you guess why…. That’s because we use this tag use to create links. That is an inline element, and it needs many attributes. Some of the attributes needed are
The href attribute
The “href” attribute is the one which contains the URL to redirect links
Target Attribute
The “target” attribute sometimes is necessary and some others is not. The target attribute indicates where the link opens. If the value of the attribute is _blank, the link is going to open another window. If value is _self is going to display in the same window; but that’s not necessary. As you can see in the example below.
Email Links
We can also create email links with the anchor tag as we show in the example below. We set the value of the href attribute to mailto:emailaddress@email.com that is going to open an email window when a user clicks on the link.
In page Links
In page links or links on the same page are also possible. The value of the href attribute contains the ID value of any part of the website using the “#” sign. The example below shows how that works.
Ordered List <ol>
We create an ordered list using the <ol> tag. Also we define list items using the <li> tag. List items are going to start with number one, and them they will continue increasing value.
Unordered Lists <ul>
Unordered list is a list where list items <li> do not display numbers. Instead they will display bullets. The example below shows how to create an unordered list.
Tables
We create tables in HTML using the <table> tag. In HTML we create a table using table rows <tr>. Each <tr> contains table details <td>. When the table row is finished, we only close the row using the closing tag </tr>. Most times in the first row we can also use the <th> tags which defines table headings as we show in the example below.
Iframes
Sometimes we want to display another site in ours. That’s when we use iframes. In iframes we use many attributes are such as source(src), or border. While the source is the URL of the website we need to display.
Images in HTML <img>
We can display Images in HTML using the <img> tag. As you can see in the example below. The image tag <img> does not need a closing tag; but it needs the source attribute(src. We may also specify the width or height with attributes in pixels, and some other unit as “ems,” “rem,s” “percentages,” etc .
<figure>
We also use The <figure> tagto display an image or multiple images in a single element. You can also add a caption for image(s) using the tag <figcaption> as shown below.
The <video> and <audio> tags
With the release of HTML5 new tags also appeared. The <audio> and the <video> tags now are also part of HTML. We use them to display video or to listen to audio. They have similar attributes. And inside them you can place many sources. You are going to listen or watch the first one recognized source. The controls attribute display the controls for <audio> or <video> as seen in the example below. Also you have the loop attribute which is going to endlessly repeat the audio or video.
Introduction to User’s Input
As you may see now, we have been only describing the elements that users can watch; besides links which redirects users to another website or another part of your website. By now we will do a brief introduction to the user’s input. I mean HTML is not a backend; when you learn some backend technologies you are going to learn a lot more about user input and how to store.
Text areas
A text area <textarea> is a multi-line text input. We need a closing and an opening tag for textures. Between them you can place text to to display as placeholder text. Using attributes you can also specify the number of rows or columns with “row” and “col” attributes. We also have the “name” attribute that is. very useful for backend purposes. The “name” attribute will be the name database is going to use to store your data.
Dropdown list <select> <option>
The select <select> tag is used to create a group of options to select one or multiple options. In the example below we can see there are many options to select only one. To select multiple options you can add the attribute “multiple” and you will be able to select multiple options.
As you also may see you can use the <optgroup> tag to assign some options to a group.
Optgroup
HTML Forms <form>
All the time we need HTML forms. As it is the only markup by now we are only going to show you how to create forms. We are not going to deal with databases.
To create a form we only need to use the form tag. Then we can use the many types of inputs available.
As the example you see below.
You can also see there are many attributes in the forms.
Label tag <label>
Before introducing forms we are going to show you the label tag. The label is only the indication we need to fill out an HTML form.
Text Input <input type=“text”>
As you see inputs do not need a closing tag. The type attribute specifies what type of input we need. The value is the type of input we need. The “type text” input accepts only text.
Passwords <input type=“password”>
The password input is similar to the text input; but when you type a password is going to show some dots. some other browsers display asterisks. Well it’s going to be a secret password.
Upload Files
it is possible to upload any file to HTML using the <input type=”file”> tag. When we create a file uploader form as the example shown above. Once we click the button it is going to open a window to choose the file we want to submit. Sometimes we can specify the file extension like JPEG, PNG, AVI, MOV for pictures or videos. Most of the times database deals with file extensions. In HTML we only indicate the type of file we need.
Submit <input type= “submit” value= “submit”>
The input type Submit is different from name and password. It is going to show a button that is going to submit the form when you click it.
The Name Attribute
The “name” attribute specifies the name database is going to store the value entered. That attribute is necessary for most inputs
Value Attribute
The value attribute is used for any value assigned to the form. Sometimes is not needed; but some others is very useful.
Maxlength Attribute
The maxlength attribute specifies the maximum number of characters an input should use. That attribute is not necessary; but sometimes is good to specify.
The Placeholder Attribute
The placeholder attribute serves as an indication of what is needed without using the <label> tag. It is not necessary; but is really useful when you want to save some browser space.
The Method Attribute
There are two different methods for HTML forms. The GET method gets the data URL when you submit the form. The POST Method encodes the data. Shows a code when you submit the form.
The Action Attribute
The action attribute most of the time is the URL or the action the form is going to perform. There are many backend programming languages and frameworks like PHP, Nodejs, Python, etc. HTML works along these languages to perform any action.
Checkboxes <input type= “checkbox”>
Checkbox is an input where you can select many choices. It can have different names and values attributes. You can see the example below.
Radio Buttons <input type= “radio”>
Radio buttons are similar to checkboxes. The difference is that you cannot select many choices. You can only select a choice and all of your choices MUST have the same name attribute.
Some Other Inputs
When HTML5 started there were many other input types introduced. Those input types are not used as often as the ones we mentioned above. Many of these input types are. Date, Color, Number, Tel, and many others. They have similar features; but developers barely used them.
Extra Markup
By now we have learned enough HTML to create any website. Now we are going to see many other code very useful to create websites. Though they are not necessary most web browser use them, and can have a great impact on your website.
Meta Tag <meta>
Although you cannot really see meta information. It is very useful for your website. It enhances the viewport of your website, specifies the encoding types (charset UTF-8 is the default), can help your website to be found by search engines, and a lot more. You can see the example below and see how it is used. It goes inside your <head> tag, and improves a lot your website.
<!DOCTYPE html>
<html lang="en">
<head>
    <meta charset="UTF-8">
    <meta http-equiv="X-UA-Compatible" content="IE=edge">
    <meta name="viewport" content="width=device-width, initial-scale=1.0">
    <title>Document</title>
</head>
<body>

</body>
</html>
Symbols
You can display many symbols in HTML using the following code. HTML tags are between “<>” symbols. For some browsers if you want to display them is going to be very difficult by only typing them. Here there are some code to create some symbols in HTML. Here there is a chart with many symbols
Division tag <div>
The Division tag <div> is used to divide content. that is a block which can be used to place. any amount of tags inside that division being only one element. If we have a specific theme under <div> tag we can create headings, paragraphs, images, etc. The example below shows how that works.
HTML5 website configuration
When HTML5 was introduced there were many elements introduced with it. The website configuration looks like the image you see below.
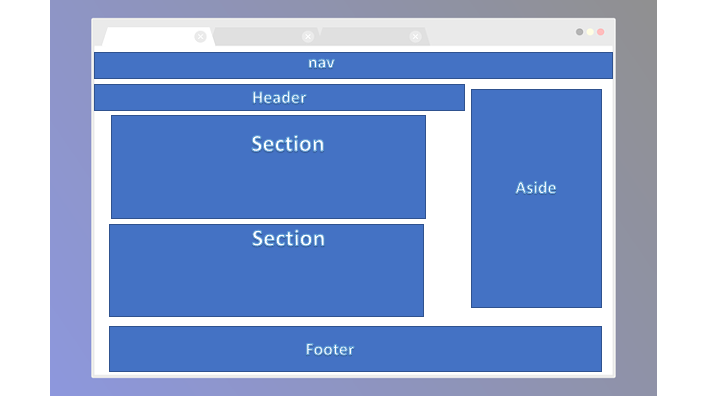
Navigation Tag <nav>
The navigation tag <nav> was introduced with HTML5. Between the opening and closing tags you can place all your navigation links as shown below and all of them are going to be displayed horizontally.
Section Tag <section>
The section tag <section> is similar to the <div> tag in regular HTML. We can use both of them in HTML5. Sections are used to group many elements in one section.
Header Tag <header>
Header tags are used for the header of any website or any section. Most of the times it is used along with <h> tags.
Footer Tag <footer>
The Footer Tag <footer> is used to group elements at the bottom of the website. We can set menus copyrights and many other elements in the footer of the website.
Small tag <small>
Sometimes inside the footer we want to insert menus, links, or some other elements that we want to display smaller than a regular. For these kind of elements we use the <small> tag. You can see an example in the picture below.
Aside tag <aside>
The <aside> tag serves as grouping elements which are not directly related to the content. Some of them should be menus and are going to be displayed on the right side of the site.
Article Tag <article>
The article tag <article> is used for specific content on the website. It does not display any special character but you can do different style later with CSS
The ID Attribute
In the link section with the anchor tag you saw the ID Attribute to create links for the same page. In reality for style and backend purposes you can assign an ID attribute to every element of the web site. As seen below. There is a heading <h1> with an ID attribute of “one.” For example purposes you may have seen tags with the same ID attribute; but we should assign an UNIQUE ID for each element we need to assign.
<h1 id="one">Hello World!</h1>
Class Attribute
The class attribute in part is similar to the ID attribute. We can assign class attribute to any element of our website. The difference is that we can assign multiple classes to any single element, and we also can have the same class for multiple elements. To assign many classes to one element we just type all the names of the class only separated with space as attribute value. Classes are so useful for styling purposes. The example below shows a paragraph with two classes “one and black”
<p class="one black">Lorem ipsum dolor sit amet consectetur adipisicing elit.
        Impedit dolorum excepturi eos magnam. Reprehenderit voluptatibus necessitatibus
        a neque quasi ipsum fugiat repudiandae fugit ducimus, numquam voluptate iusto. Quae,
         officia minus?
</p>
Practice tool
Along this tutorial we have seen many examples using a great tool that is also very useful to practice. That tool is Codepen. It’s very useful to practice HTML/CSS and Javascript. in Codepen we can type and see the results right away. Very good tool to practice.