Basics of MongoDB

As you may know, there are many databases that use the “Structure Query Language SQL” as their base language. Now we are going to learn about one database that is not based on SQL. That database is MongoDB. As we mentioned MongoDB is not based on SQL. It’s more based on a syntax similar to “JavaScript Object Notation JSON.” This tutorial is going to get you through the basics of MongoDB. We are going to learn all the necessary MongoDB to Implement on our applications. By now we assume that you have some JavaScript knowledge; especially some JSON. Let us start learning MongoDB; It’s going to be fun.
Definition
As we stated before, MongoDB is a NoSQL database system. MongoDB Main purpose is to ease application development and scaling. There are many ways to run MongoDB; The two most used ones are “MongoDB Atlas,” and Locally Installed MongoDB. Now We are going to show. you how to use MongoDB in both of these ways.
MongoDB Atlas
MongoDB Atlas is one way of implementing MongoDB. The main advantage of MongoDB Atlas is that we can create and use our databases in the cloud. We first need to create an account in MongoDB Atlas. Then we create organizations and clusters. Once we create a cluster in an organization we are ready to use our database. Most times they provide a unique string that serves to connect the database to our application. This tutorial is only about MongoDB. In some other tutorials we are going to create an application and connect it to MongoDB Atlas. Now we are only going to see how to create clusters in MongoDB Atlas.
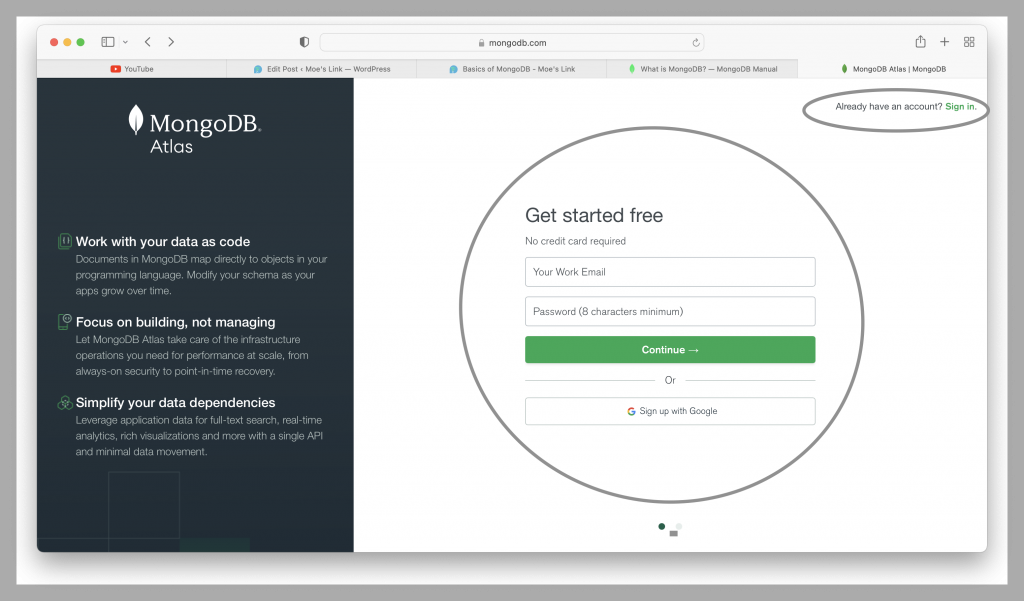
Creating MongoDB Atlas Account
In order to create a MongoDB Atlas Account, We only need to go to their website and create the account. The image below shows you their home page. You can create an account in their web site just like in any other.
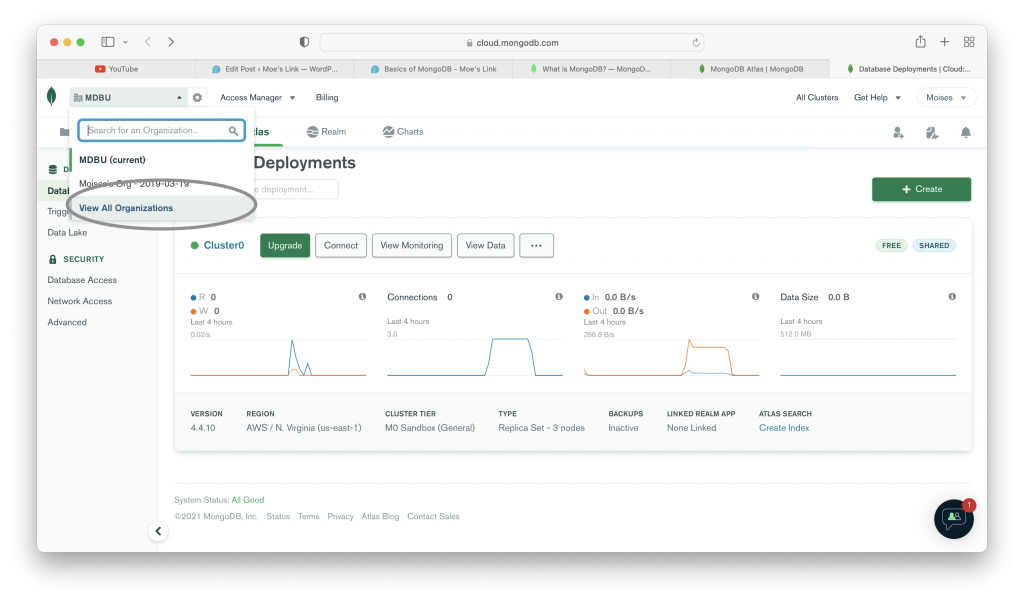
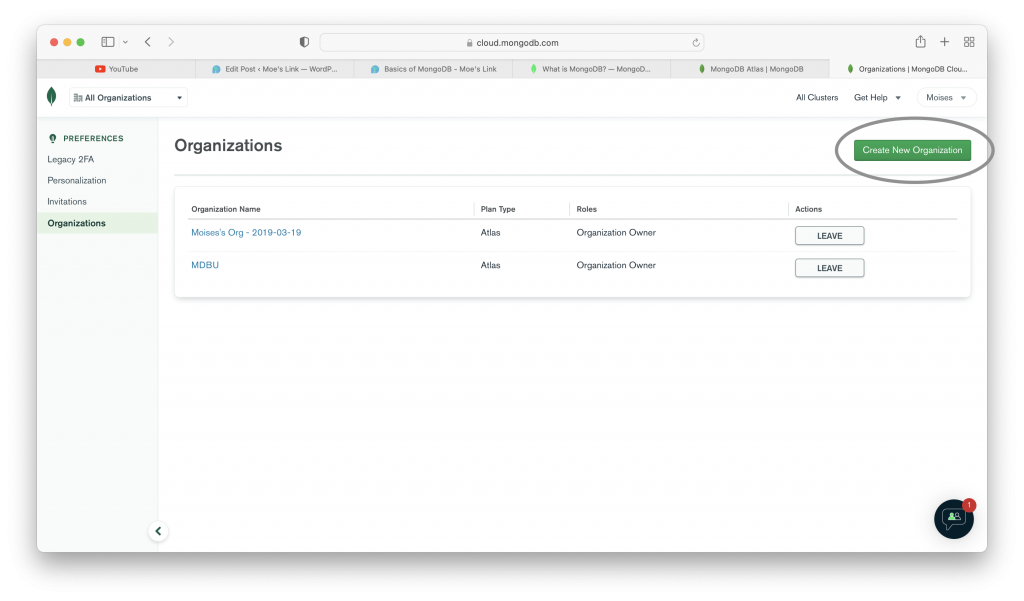
Creating a MongoDB Atlas Organization
Once we create an account on the MongoDB Atlas website, we can create an organization. That task is quite easy. There are many other images below that shows you how to create an organization in MongoDB Atlas. It also shows you a running cluster; but don’t worry about that.
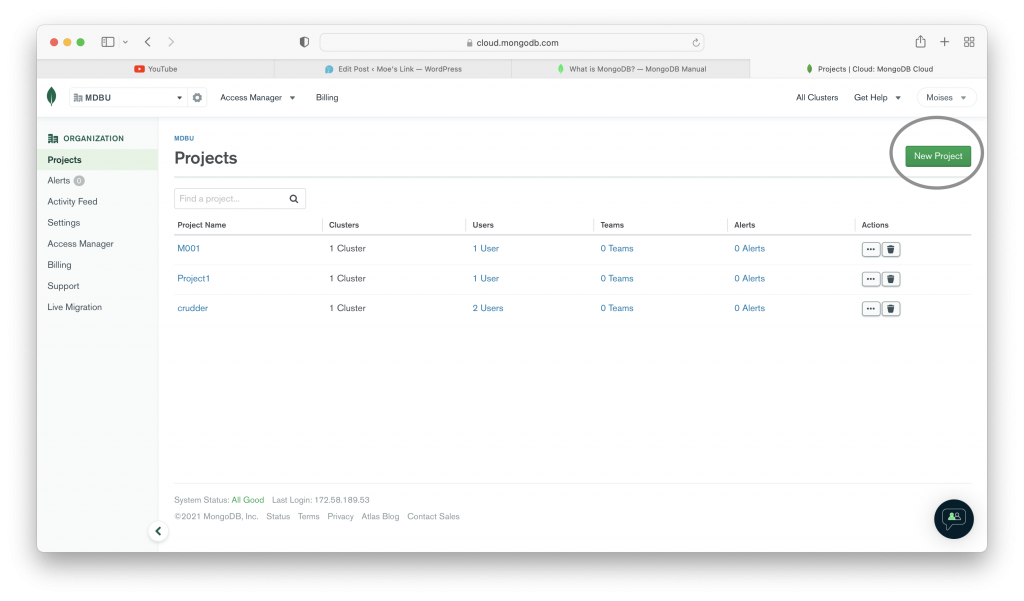
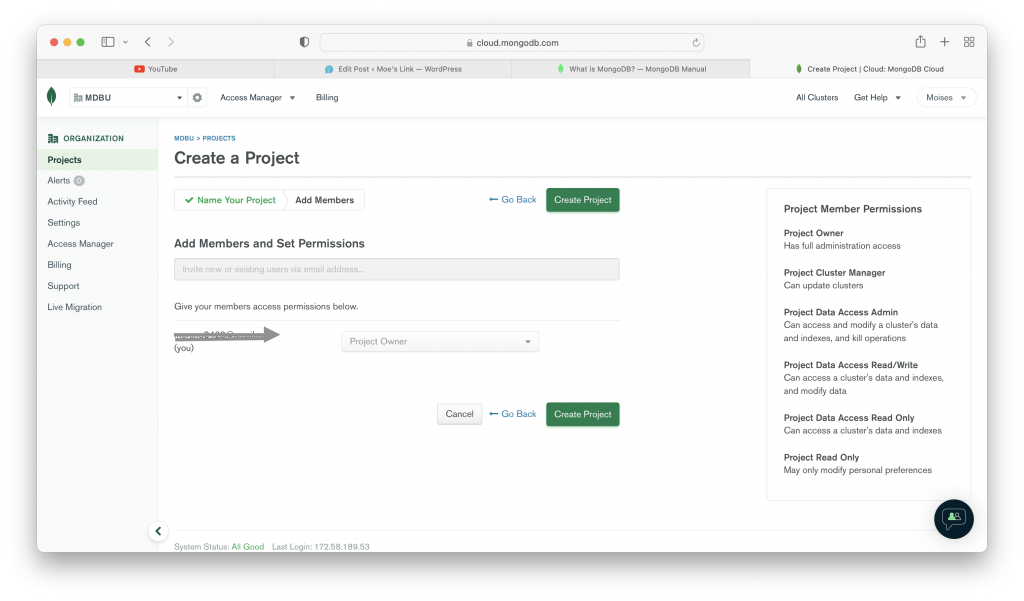
Creating a Cluster
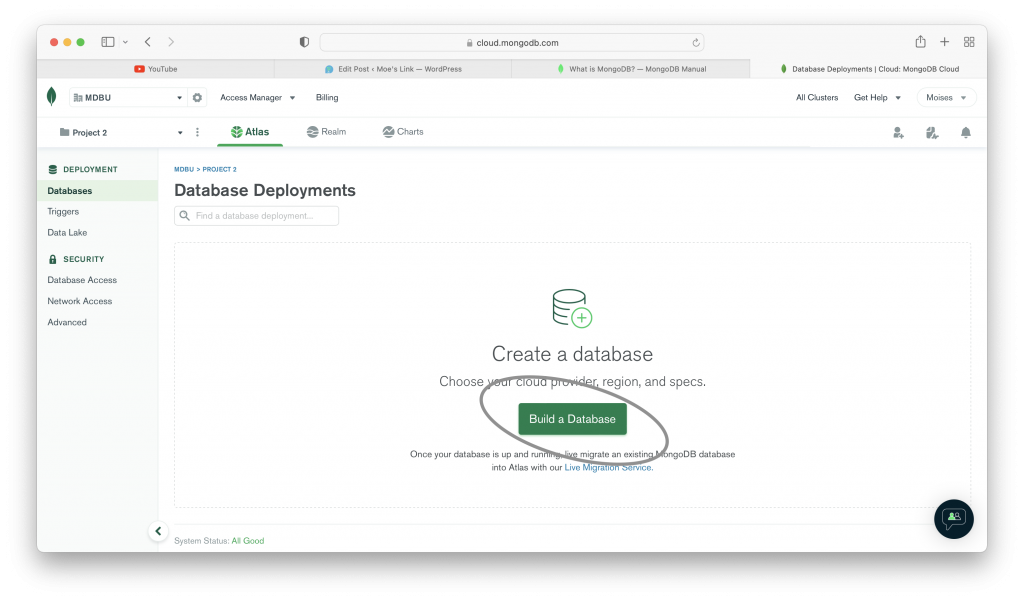
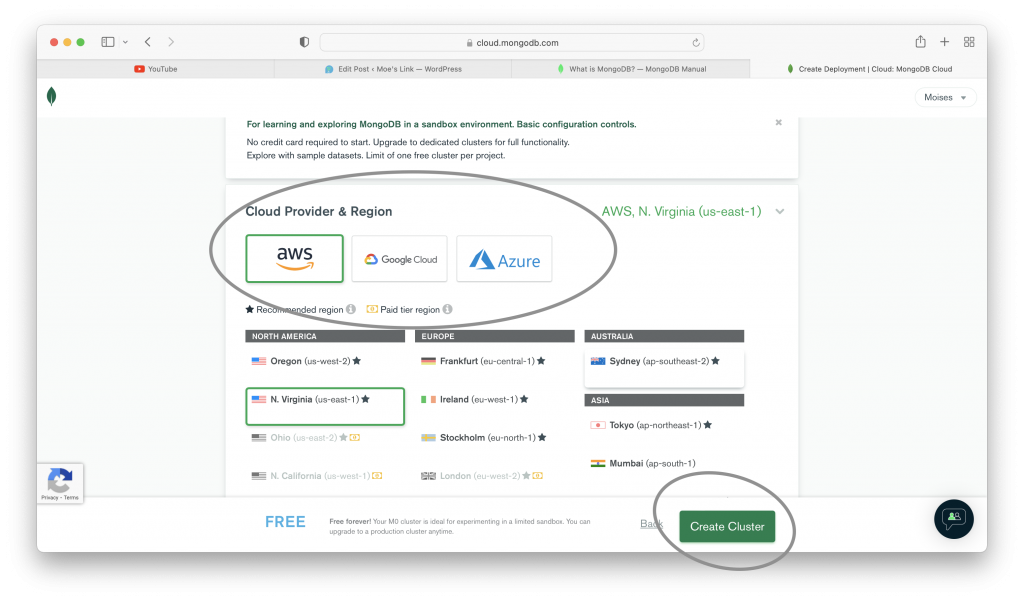
The two previous images show you how to create an organization in MongoDB. Once you create an organization, you can create a database cluster in your organization. That cluster is the one that is going to hold your database. The following images show you the steps to create a database cluster.

Using Your Database Cluster
After you finish with all the steps shown in the images above. You can use your database. MongoDB Atlas provide you a string to use your database in your project. Another set of images below show you how to use your database cluster.
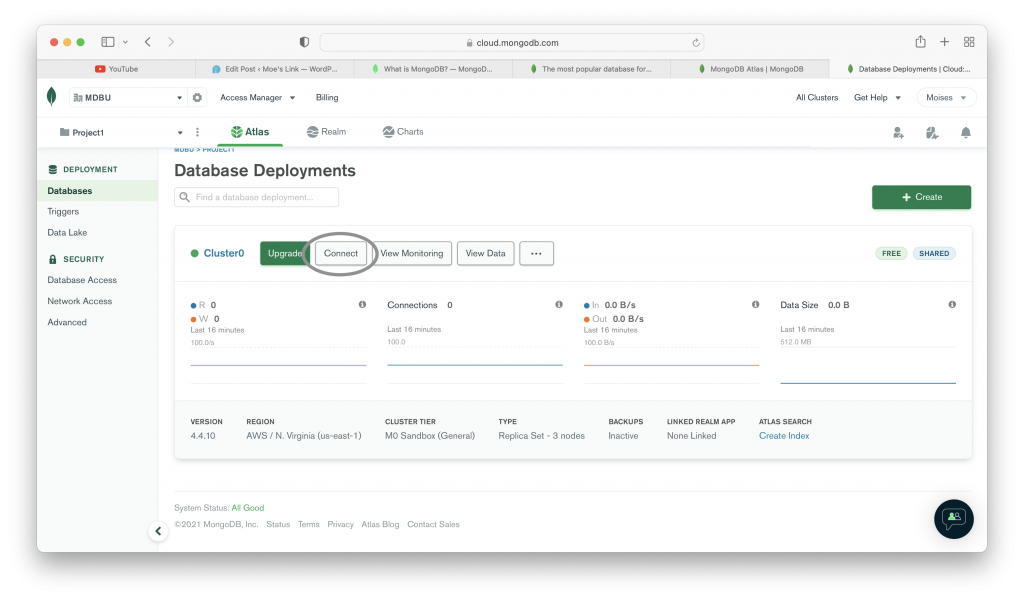
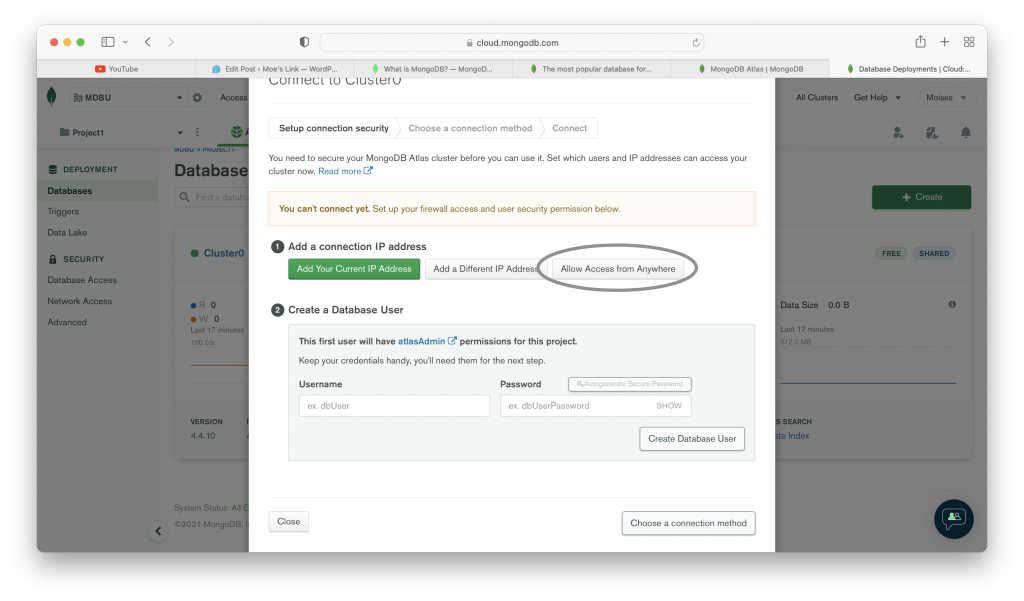
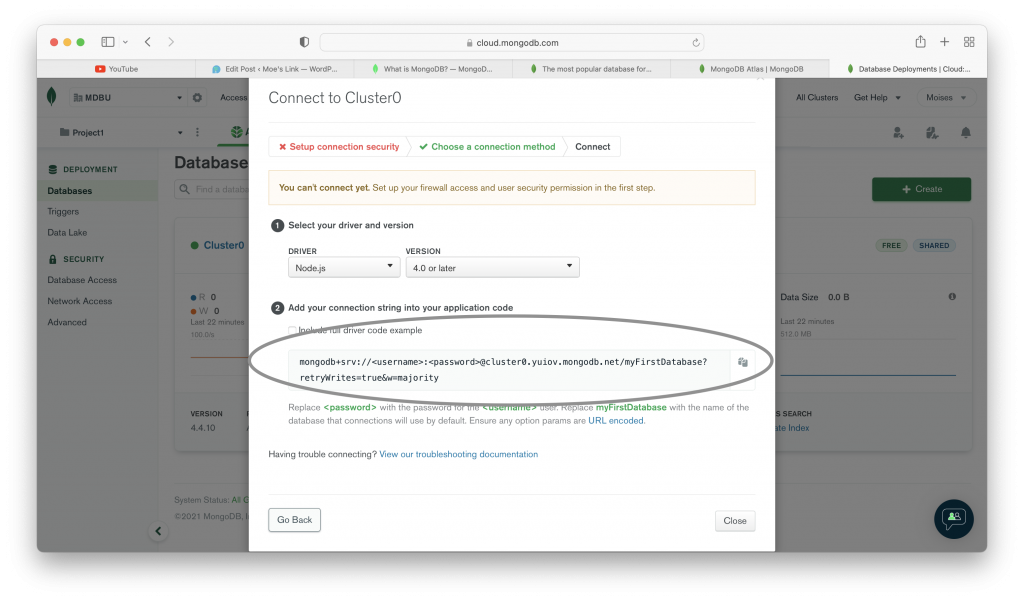
The images above show you how to use a MongoDB Atlas database in your application. As you could see there is a string that we can include in our application in order to use the database. If you followed the steps that we showed you in the images, you could also see some other methods to connect your database. You can choose the one you need.
Locally Installed MongoDB
We could see above that we can use MongoDB in the cloud. Although it’s quite easy to MongoDB in the cloud, my preferred method is to locally install MongoDB. Maybe you occupy some storage in your computer; but you will have everything locally while working in your projects. We only need to install and initialize MongoDB to start using it locally. We can install mongoDB in Windows, MacOS, and Linux. As you should know these are the most used operating systems.
Installing MongoDB on Windows
Installing MongoDB on Windows is an easy task. That is because you only need to download the MongoDB installer from the MongoDB Download Center. After you download the installer, you install MongoDB following the instructions of the installer. For Most operating systems we use MongoDB Community Edition. It’s free, and by now it’s also all you need.
Installing MongoDB on MacOS
It’s a little bit more tricky to install MongoDB in MacOS. That’s because in MacOS you don’t use an installer; you install MongoDB from the terminal. You also need to have in your system the Xcode command line tool and Homebrew. Once you have everything installed, you can install MongoDB by typing the following commands in your terminal.
brew tap mongodb/brew
The Command above is going to get the official MongoDB version from Homebrew. Then you can install MongoDB in your system with the following command.
brew install mongodb-community@5.0
As you can see this command is going to install MongoDB Community Version 5.0. That is the current version at the time of this tutorial. You can install the version you desire once a new version is available.
Initialize MongoDB
The commands you saw above show you how to install MongoDB in your system. After the installation you will not be able to use MongoDB unless you initialize it. Some people install MongoDB and spend time trying to use without initializing and not getting any results. To initialize MongoDB, you only need to type the following command in your terminal.
brew services start mongodb-community@5.0
That command is going to initialize MongoDB in your system, and you will be able to start working with MongoDB databases in your system.
MongoDB First Steps
The steps we mentioned above were all to set the MongoDB environment. After you set one of the two work environments, you can start working with MongoDB. The MongoDB shell mongosh is the one responsible for MongoDB database management. In order to start using MongoDB, we only need to type the mongosh command in our terminal. Once we type the mongosh command in our terminal we can see MongoDB environment and start working.
 ~ % mongosh
Current Mongosh Log ID:	6192ada3da035d7a9f0013b8
Connecting to:		mongodb://127.0.0.1:27017/?directConnection=true&serverSelectionTimeoutMS=2000
Using MongoDB:		5.0.2
Using Mongosh:		1.0.6

For mongosh info see: https://docs.mongodb.com/mongodb-shell/

------
   The server generated these startup warnings when booting:
   2021-11-15T07:46:36.293-05:00: Access control is not enabled for the database. Read and write access to data and configuration is unrestricted
------

Warning: Found ~/.mongorc.js, but not ~/.mongoshrc.js. ~/.mongorc.js will not be loaded.
  You may want to copy or rename ~/.mongorc.js to ~/.mongoshrc.js.

>
Available Databases
In the section above you could start the MongoDB environment by only typing the mongosh command. By now you should ignore some warnings. Later you can update your system if required. Then you can start working on your MongoDB environment. The first thing we are going to do is seeing the already existing databases in the system. In order to see all databases in the system, we only need to type the show dbs command as you can see below.
> show dbs
admin    0.000GB
config   0.000GB
local    0.000GB
>
Some of the databases we can see after we type the command, are created by default in MongoDB. We are going to create our own databases and work with them. To create a database in MongoDB, we only need to type the use command followed by the database name we desire. In this case we are going to create a database called customers.
Take note that when we type the use command it’s going to create a database with the name we typed if a database with that name does not exist. If there is a database with that name, the system will assume you want to use the existing database. To create the customers database we only need to type use customers. Then the system will create a database called customers as you can see in the following example.
> use customers
switched to db customers
>
Creating Database Collections
Once we create a MongoDB Database, you can start inserting data in your database. Data in MongoDB is stored in collections; not in tables as the SQL based databases. There are many ways of creating a collection. All these ways include the db.createCollection() function. Now we are going to show you the two most used ways of creating a collection.
customers> db.createCollection("domesticCustomers", { customerName: String, customerGender: String, customerCity: String, customerAge: Number});
{ ok: 1 }

customers> db.createCollection("foreignCustomers");
{ ok: 1 }
customers>
The example above shows you two ways of creating collections. In the first one you specified the fields and types of data to be used. The second one only creates a collection without any specified fields. Although you could see a confirmation that collection was created { ok: 1 }, you can also confirm the creation of your collections using the command show collections as you can see in the example below.
customers> show collections
domesticCustomers
foreignCustomers
JSON and BSON
Starting this tutorial we specified that data in MongoDB is stored in collections. We also specified that in MongoDB we use syntax similar to JSON. That syntax is called “Binary JSON” or BSON. BSON is similar to JSON; but it’s more like an encoded serialization of JSON. We can find useful information in the BSON website.
Inserting Data into Collections
Now that we know that MongoDB data is stored in BSON, it’s time to insert some data into our collections. The two most used functions to insert data into MongoDB are insertOne() and insertMany(). Previous versions of MongoDB used the insert() function. That function still work; but it’s going to be deprecated soon. We can use the mentioned functions with the syntax db.collection.insertOne, or db.collection.insertMany(). Where db refers to database, and collection is the collection name. now let us insert some data into our collections.
customers> db.domesticCustomers.insertOne({ customerName: "John Smith", CustomerGender:"Male", CustomerCity: "Washington", customerAge: 35} );

{
  acknowledged: true,
  insertedId: ObjectId("6195101d4543a38e25ba68c3")
}


customers> db.domesticCustomers.insertMany([{customerName: "Jackeline Johnson", CustomerGender:"Female", CustomerCity: "Los Angeles", customerAge: 42},{customerName: "James Peterson", CustomerGender:"Male", CustomerCity: "New York", customerAge: 27}, {customerName: "Peter Parker", CustomerGender:"Male", CustomerCity: "Chicago", customerAge: 22}, {customerName: "Sarah Reynolds", CustomerGender:"Female", CustomerCity: "Detroit", customerAge: 30}]);

{
  acknowledged: true,
  insertedIds: {
    '0': ObjectId("619512824543a38e25ba68c4"),
    '1': ObjectId("619512824543a38e25ba68c5"),
    '2': ObjectId("619512824543a38e25ba68c6"),
    '3': ObjectId("619512824543a38e25ba68c7")
  }
}
Data ID
You could see in the example above that we inserted data using the two most used functions. We inserted only one record or object with the insertOne() function. After that we inserted an array of objects or records using the insertMany() function. Once you insert the objects into your collections, you can see that system returned their ID. In MongoDB all objects contain an unique ID auto assigned by the system. You don’t have to worry about assigning a PRIMARY KEY as in SQL; In MongoDB you have it automatically.
Visualizing Data
After we insert data into any MongoDB collection, we can visualize it using the find() function. In case you have a lot of objects and want to find only one containing certain data, you can use the findOne() function. Also if you want to find many objects containing similar data you can use the findMany() function. As we have only two collections with only a few records, the example below is going to show you how to use the find() function. You can use these function with a syntax similar to the insert functions. db.collection.find(), db.collectionfindOne(), db.collection.findMany(). As you may already know collection is the collection name.
customers> db.domesticCustomers.find();
[
  {
    _id: ObjectId("6195101d4543a38e25ba68c3"),
    customerName: 'John Smith',
    CustomerGender: 'Male',
    CustomerCity: 'Washington',
    customerAge: 35
  },
  {
    _id: ObjectId("619512824543a38e25ba68c4"),
    customerName: 'Jackeline Johnson',
    CustomerGender: 'Female',
    CustomerCity: 'Los Angeles',
    customerAge: 42
  },
  {
    _id: ObjectId("619512824543a38e25ba68c5"),
    customerName: 'James Peterson',
    CustomerGender: 'Male',
    CustomerCity: 'New York',
    customerAge: 27
  },
  {
    _id: ObjectId("619512824543a38e25ba68c6"),
    customerName: 'Peter Parker',
    CustomerGender: 'Male',
    CustomerCity: 'Chicago',
    customerAge: 22
  },
  {
    _id: ObjectId("619512824543a38e25ba68c7"),
    customerName: 'Sarah Reynolds',
    CustomerGender: 'Female',
    CustomerCity: 'Detroit',
    customerAge: 30
  }
]
Find Functions with Parameters
We can also use some parameters to find a record. Most times we use the ID to find any specific record. That is because the ID is unique. The findOne() function is going to find the first object containing the specified information, while the findMany() function is going to find all the records with similar information in the specified fields. The example below is going to use the find function with the _id parameter. You will find a only one record with the specified ID. In case we use findOne() or findMany() even the find() function, we can use different parameters not only the _id.
customers> db.domesticCustomers.find({  _id: ObjectId("619512824543a38e25ba68c4")});
[
  {
    _id: ObjectId("619512824543a38e25ba68c4"),
    customerName: 'Jackeline Johnson',
    CustomerGender: 'Female',
    CustomerCity: 'Los Angeles',
    customerAge: 42
  }
]
Creating Objects differently
When we created the two collections in our database, you could see that we specified the fields in only one. The other collection we only specified the name. That is because we can insert as many fields as we want in any collection. Remember that MongoDB works with documents; not with tables as SQL. in the example below we are going to insert one object with one more field in the domesticCustomers collection. We are also going to insert some objects in the foreignCustomers collection.
customers> db.domesticCustomers.insertOne({customerName: "Jose Martinez", customerGender: "Male", customerCity: "Madison", customerAge: 33, customerEtnicy: "Hispanic" });
{
  acknowledged: true,
  insertedId: ObjectId("61953e0a4543a38e25ba68c8")
}
As you can see we successfully could enter another object containing an extra field. If we use the find() function for the collection, we are going to see another field similar to the one below.
{
    _id: ObjectId("61953e0a4543a38e25ba68c8"),
    customerName: 'Jose Martinez',
    customerGender: 'Male',
    customerCity: 'Madison',
    customerAge: 33,
    customerEtnicy: 'Hispanic'
  }
As you can see, we can insert as many fields as we want for any object in our collections. Now we are going to insert many records in the foreignCustomers collection.
customers> db.foreignCustomers.insertMany([{customerName: "Pedro Lopez",  customerCountry: "Mexico", customerPayment: 10000},{customerName: "Francois  Pierre",  customerCountry: "France", customerPayment: 50000},{customerName: "Mustafa Ali",  customerCountry: "Pakistan", customerPayment: 30000, customerPlaces: 7}]);
{
  acknowledged: true,
  insertedIds: {
    '0': ObjectId("619541e24543a38e25ba68c9"),
    '1': ObjectId("619541e24543a38e25ba68ca"),
    '2': ObjectId("619541e24543a38e25ba68cb")
  }
}
Now we can see the results using the find() function.
customers> db.foreignCustomers.find();
[
  {
    _id: ObjectId("619541e24543a38e25ba68c9"),
    customerName: 'Pedro Lopez',
    customerCountry: 'Mexico',
    customerPayment: 10000
  },
  {
    _id: ObjectId("619541e24543a38e25ba68ca"),
    customerName: 'Francois  Pierre',
    customerCountry: 'France',
    customerPayment: 50000
  },
  {
    _id: ObjectId("619541e24543a38e25ba68cb"),
    customerName: 'Mustafa Ali',
    customerCountry: 'Pakistan',
    customerPayment: 30000,
    customerPlaces: 7
  }
]
Another way of creating collections
The examples above show you how to insert data into collections already created. In case we want to insert data into another collection we can create a collection even without using the db.createCollection() function. We just need to specify the name of the collection we want to create while inserting the data. The example below is going to create a new collection called customerProducts and insert data at the same time.
customers> db.customerProducts.insertMany([{production:"rice", meat: "beef", quantityInPounds: 500},{production:" beans", meat: "chicken", quantityInPouns: 800}]);
{
  acknowledged: true,
  insertedIds: {
    '0': ObjectId("619544d84543a38e25ba68cc"),
    '1': ObjectId("619544d84543a38e25ba68cd")
  }
}
Now we can use the commands show collections and see there is a new collection; also we can use the find() function with the new collection as you can see below.
customers> show collections
customerProducts
domesticCustomers
foreignCustomers


customers> db.customerProducts.find();
[
  {
    _id: ObjectId("619544d84543a38e25ba68cc"),
    production: 'rice',
    meat: 'beef',
    quantityInPounds: 500
  },
  {
    _id: ObjectId("619544d84543a38e25ba68cd"),
    production: ' beans',
    meat: 'chicken',
    quantityInPouns: 800
  }
]
Updating Data in MongoDB
We can also update data in MongoDB using some functions. The functions we use to update data are the updateOne(), the updateMany() and we can also use the replaceOne() function. We use a syntax similar to the insert and find() functions. db.collection.updateOne(), db.collection.updateMany(), and db.collection.replaceOne(). Here we only show you the updateOne() function using the _id as parameter to update. The other functions work similar.
customers> db.domesticCustomers.updateOne({_id: ObjectId("619512824543a38e25ba68c5")},
 {$set: {customerName: "James Thomason", CustomerCity: "Boston"}});
{
  acknowledged: true,
  insertedId: null,
  matchedCount: 1,
  modifiedCount: 1,
  upsertedCount: 0
}
As you can see we could update one object in our collection using the updateOne() function. We first declared the id, and then we set the new values. If you type the find() function, you can see the new results.
Deleting Data in MongoDB
As in any other database we can delete data in MongoDB. We can delete any data by using the delete functions. These functions are deleteOne() and deleteMany(). The syntax is similar to the other functions we already used. Now we are going to show you how to delete any object using the deleteOne function. As you may think, we are going to delete the object by ID
customers> db.domesticCustomers.deleteOne({_id: ObjectId("6195101d4543a38e25ba68c3")});
{ acknowledged: true, deletedCount: 1 }
customers>
Now we deleted only one object. If you use the find() function, you won’t see the John Smith field. As the _Id is an unique value, deleting and updating by ID is a good practice.
Deleting All Objects in a Collection
Before deleting all objects in a collection we need to know if the database have some important information. Now we can delete all objects in any collection because this practice data. Working in the field you would need to know if it’s ok to delete all data in a collection. We can delete all data in a collection with only one function. That function is the remove() function. We only type empty braces {} as parameter in the remove() function in order remove everything from the collection. The example below shows you how to remove everything from the customerProducts collection.
customers> db.customerProducts.remove({});
{ acknowledged: true, deletedCount: 2 }
If you try to use the find() function in the collection, you will find nothing. The collection will be empty. This function still works; but you can get a deprecation warning and some other suggestions.
Deleting a Collection
The previous example shows you how to delete all data in a collection. We can also delete the whole collection and all the data in the collection is going to be deleted with it. In order to delete any collection we only need to use the drop() function. We can use this function as many other functions described above. db.collection.drop(). Now we are going to delete the foreignCustomer collection.
customers> db.foreignCustomers.drop();
true
As you can see once we drop the collection, it will return true. In case it returns false you did not delete any collection. Now if we use the show collections command, we can see the other collections. The one we deleted is not there.
Deleting a Database
Before deleting a database we need to know what information it has Now we can delete a practice database; in a professional environment you need to know before deleting. We can use the dropDatabase() function to delete any database. Now we can delete the same database we have been working with. The customers database. We use the dropDatabase() function in the following way.
customers> db.dropDatabase();

{ ok: 1, dropped: 'customers' }
Final Notes
By now you have seen the basics of MongoDB. This information is very useful for MongoDB database development. You saw that MongoDB works with documents not with tables; so it’s very different than SQL. Also we need to be advised that MongoDB is case sensitive. In case you have any misspelled field, or any upper/lower case difference; MongoDB will automatically create a new one with the information we entered. In order to avoid that, we can use a MongoDB ODM. Mongoose and MongoClient are very popular MongoDB ODMs.
Although MongoDB can be used in many environments, it’s widely used in Nodejs. This information is only the basics of MongoDB. There is a free MongoDB University website where we can learn with all of their free courses. Thanks for visiting our blog. We hope you learned a lot in this tutorial.